5 minutes
Getting Started With Hugo in Windows

Introduction
Hugo is a so-called static site generator written in GoLang, and it’s strong suit lies in speed and flexibility. Furthermore, Hugo is relatively easy to use and beginner-friendly. Since a blog is usually a personal static website, Hugo is very suitable for that. In this post, I want to show how you can quickly set up a simple blog using Hugo in Windows. Additionally, I want to explain how you can use GitHub Pages to host your blog, so that it’s available on the internet 24/7.
Installing Packages
For starters, we need to install a few packages. This can be done with the pre-installed Windows application PowerShell, but I recommend using Windows Terminal, which can be downloaded from the Microsoft Store. Once the installation is complete, simply run the application as administrator.
Chocolatey
The first thing we want to install is a package manager called Chocolatey. An alternative is Scoop, but in this post we will stick to former. In the Windows Terminal we type the following line:
Get-ExecutionPolicy
If the terminal returns Restricted, we need to change that using
Set-ExecutionPolicy AllSigned
Afterwards we install Chocolatey using the following line:
Set-ExecutionPolicy Bypass -Scope Process -Force; [System.Net.ServicePointManager]::SecurityProtocol = [System.Net.ServicePointManager]::SecurityProtocol -bor 3072; iex ((New-Object System.Net.WebClient).DownloadString('https://community.chocolatey.org/install.ps1'))
Once the process is finished, we can run
choco
to check if it’s properly installed. In my case, it returns the following:

Hugo
Now we need to install the Hugo package to be able to create a blog and run it. We can do that using Chocolatey we just installed using the following line in the Windows Terminal:
choco install hugo -confirm
If you plan on using advanced languages like SCSS, install Hugo Extended instead.
choco install hugo-extended -confirm
With that we have everything we need to start a new Hugo blog.
Creating a new blog and installing a theme
To create a brand new blog, simply go inside the directory where you want your blog to be and type:
hugo new site myblog
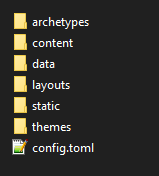
If you have a specific name for your blog in mind, simply replace myblog with that name. After
running the command, your blog folder should have the following files and folders:

If we open config.toml file, we can see the following:
baseURL = 'http://example.org/'
languageCode = 'en-us'
title = 'My New Hugo Site'
As you can see, this file only contains default values and need to be adjusted accordingly. I recommend checking out this page to see all the different configuration settings. We will come back to this later.
Next up, we have to option to choose a Hugo theme (unless you want to build your own Hugo theme from scratch, which is a lot of work and not recommendable for beginners). To see all available and free themes, we can either use https://themes.gohugo.io or https://hugothemesfree.com/, and choose a specific theme. In my case, I chose PaperMod, since it’s simple and minimalistic. Each theme should have a small section explaining how to install it.
Depending on what you want to do, there are two different approaches when it comes to installing a theme. Simply skip the other approach after choosing one.
Installing via git clone
If you don’t plan to make any changes to the theme, you can simply clone the theme via git. To do
that, simply switch to the themes folder and open Windows Terminal. There you want to run the
following command:
git clone https://github.com/adityatelange/hugo-PaperMod.git
If you decided on a different theme, simply replace the link with the one of your theme. This approach
has the advantage that you can always get the latest features from the developers of the
theme. Finally, we need update our config.toml file with the following line:
theme: "PaperMod"
Again, if you took a different theme, replace "PaperMod" with the name of your theme.
Installing manually
This approach is intended if you plan to tweak the theme to suit your needs. Simply download the theme
as a zip file from the website and unpack it inside the themes folder.
In my case with Hugo PaperMod, I can download the zip file using this link.
Lastly, we update our config.toml file with the following line:
theme: "PaperMod"
If you decided on a different theme, simply replace "PaperMod" with the name of the theme of your
choice.
Running the blog and preview
Once we finished the above steps, we can run the following command
hugo server
which allows us to view the blog under http://localhost:1313. For me, it looks like this:
[WIP]
- Preview
Writing your first post
Once our blog is ready and set up, we can create our first post. To do that, simply enter
hugo new posts/my-first-post.md
in the terminal. Basically it creates a new markdown file my-first-post.md inside the posts
folder. If you open the file, you can see that the title and date was automatically filled inside
the front matter.
[WIP]
- Explain what the front matter is, and how one can change it
Hosting using GitHub Pages
GitHub offers a great service called GitHub Pages to host your own static website. Hugo works very well with it, and many people use that service to host their personal blog. In this post I want to show you how you can use GitHub Pages to host your blog as well. The only requirement is to have a GitHub account, which you can create quickly and for free.
The first thing we need to do is to create a GitHub Repository named username.github.io with username being the name of your GitHub account.